Introduction
Oracle Audit
Vault is a security product that gathers
auditing information from remote databases and store them in a single
centralized warehouse database. Suppose you have different machine in a
different
database, that’s time really tough to monitor what happens in different
database at a time. By using an audit vault system you can monitor every
database in a single dashboard and you can apply policies which alerts you and
provide you desires report.
Ø
Audit vault itself
has different types of reports like Activity reports, Alert reports, user
privileges report, and stored procedure audit reports.
Ø
Oracle Audit vault
raise alerts any types of suspicious transactions.
Ø
Capture
before/after values from transaction logs.
Ø
Automated clean-up
of Oracle database audit data on source systems, no need to manage the audit database.
Installation:
Download Audit Vault Software
A.
Download Media
1.
Download media from https://edelivery.oracle.com/.
·
Open a web browser.
·
Type https://edelivery.oracle.com/ in the address bar.
·
Press "<Enter>"
key.
· Click on "Sign
In / Register" button.
Prerequisites/Current
Environment
1. Laptop/PC
Audit
Vault Version – 12.2.0.5.0
· Latest and fast processors
· At least 8GB memory, but I am using 3GB memory
· Windows 64 bit
· At least 250GB Hardisk, rather than 250GB storage you can installed
Audit vault server.
· Network
Interface Card (NIC): 1
AV
server (VMware® Workstation 12 Pro, installed
Oracle Linux 6)
IP Address: 192.168.169.15
Subnet Mask: 255.255.255.0
Gateway: 192.168.169.1
Host
Machine (VMware® Workstation 12 Pro, Linux 7.6)
IP Address: 192.168.169.11
Subnet Mask: 255.255.255.0
Gateway: 192.168.169.1
Install the
Software
To install an Audit Vault Server
or Database Firewall:
- Now once
the .iso files are downloaded mount the first .iso and boot the host,
you’ll be presented with below screen, click ENTER to start the
installation.
The system
is booted from the disk, and the initial splash screen appears, similar to the
following:
 Type install, and then press
the Enter key.
The installation proceeds. After some time, the
screen displays this message:
Enter Installation Passphrase.
Enter a strong passphrase.
This passphrase will be used later to change other system passwords.
It is recommended to note the password securely for future reference.
Now next it
will ask you to select the NIC and then setup the IP address for the same.
Hit select, and
set the IP address as below:-
IP Address: - 192.168.169.15
Network Mask: -
255.255.255.0
Gateway: 192.168.169.1
The hit Finish
install and boot the host (Note to unmount the iso files) and you’ll be
presented with below screen once host is started again,
This marks the
installation to be complete, which now lets us to proceed with POST
installation task as shown below:-
Now once the
installation is complete open the browser and type in the url as below to open
the console page for AUDIT VAULT.
Login in Oracle Audit vault Server:
https://192.168.169.15/console/
Oracle
Audit Vault has Two Schema
One is
AVADMIN where you can do all types of administrator job.
Another is AVAUDITOR which helped you to
monitor audit information.
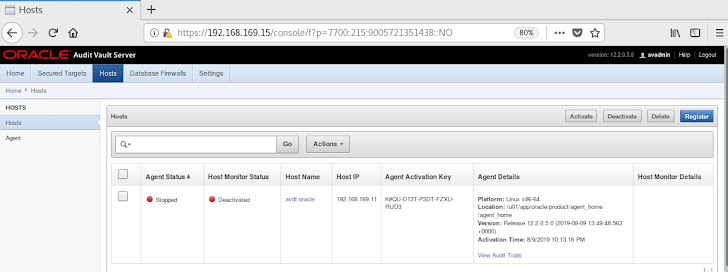
Step1: Register a host
Host Name: avdf.oracle
IP address:
192.168.169.11
Service: ORA11G
Log as "AVADMIN" to AV and Register put the host name and
the Ip address
Register the host
Note: - This steps is can use with Linux and windows both
Status of the added hosts
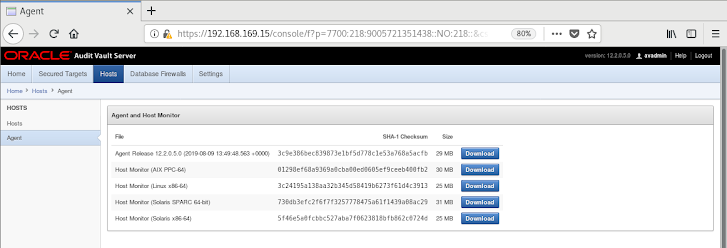
Step 2: Download agent
Install agent on (Oracle Linux, Red hat Linux, Solaris, AIX,
Windows )
Then download the agent from the Agent tab download "agent
release"
Prerequisite Verify the installed packages
[root@avdf
bin]# rpm -qa | egrep -i "(jdk|jre)"
java-1.8.0-openjdk-headless-1.8.0.181-7.b13.el7.x86_64
java-1.8.0-openjdk-1.8.0.181-7.b13.el7.x86_64
java-1.8.0-openjdk-1.8.0.181-7.b13.el7.i686
Verify the PATH is set properly
[root@avdf bin]# java -version
java version
"1.8.0_211"
Java(TM) SE
Runtime Environment (build 1.8.0_211-b12)
Java
HotSpot(TM) 64-Bit Server VM (build 25.211-b12, mixed mode)
Create
Directory
[root@avdf agent_home]# mkdir /agent_home/AV/
Copy Agent.jar to (/agent_home/AV)
using winscp or relevant tool
Set permission to other user (oracle:dba)
[root@avdf product]# chown -R oracle:dba /agent_home/AV/
Step 3: Deploy
agent.jar in hosts
[root@avdf product]#cd / agent_home/AV/
[root@avdf
av]# java -jar agent.jar -d
/agent_home/AV/
Step 4: Now
activate the agent
[root@avdf product]# cd /agent_home/AV/bin
[root@avdf
bin]# ./agentctl activate
Step 5: Now
activate it from console. You find agent version
Step 6: Now
start the agent with generated KEY
[root@avdf
bin]# ./agentctl
start –k
Enter Activation Key:
Agent started successfully.
Note: - Above activation
will ask the Activation key please copy and paste it from the "Agent
Activation Key" form AV.
Now Agent status is "running"
d
Start
stop agent
[root@avdf bin]# ./agentctl
start
Agent started successfully.
[root@avdf bin]# ./agentctl
stop
Stopping Agent...
Note:-ones you restart the
server you must start the agent.
Step
7: Create Audit user in database avagent
sql>create user avagent identified by avagent;
SQL>@/home/oracle/app/oracle/product/agent_home/av/plugins/com.oracle.av.plugin.oracle/ config/oracle_user_setup.sql avagent SETUP
Session
altered.
Granting
privileges to AVAGENT ... Done.
Disconnected
from Oracle Database 11g Enterprise Edition Release 11.2.0.4.0 - 64bit
Production
With the
Partitioning, OLAP, Data Mining and Real Application Testing options
Step
8: Secured target setup
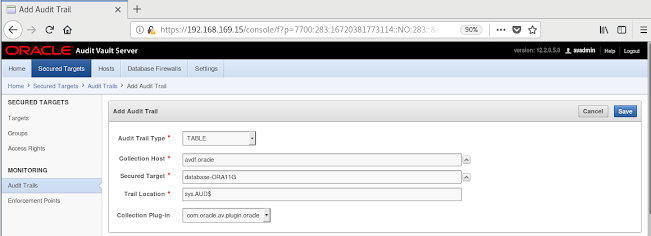
Step 9: Add
Audit trail
Step 10: Start
audit trail
Step
11: audit enable xyz.employee;
SQL> audit all on xyz.employee;
Audit
succeeded.
Step
12: Retrieve audit settings using avauditor user
Download
report and monitor the activity..!!


